So you may have seen some of my other tutorials showing you how to capture HDR photos with your GoPro. In this tutorial, I will go over the steps of how you can easily create beautiful GoPro time-lapses with an HDR look. Now true HDR requires 3 different exposed photos that are then merged into one image, but for this tutorial, we will be using just the normal images created with your GoPro when capturing time-lapses in photo mode.
We will be using software called Photomatix from HDRsoft.com to batch edit our time-lapse photo sequence and then use GoPro Studio to finish it off. This method will convert each image to look like a true HDR photo with all its vibrant beauty. Please Note: This method will only work for time lapses shot in photo mode with your GoPro. I used a GoPro Hero 5 Black to capture the images that I will be using for this tutorial. Images captured with older generations of the GoPro Hero will work the same way.
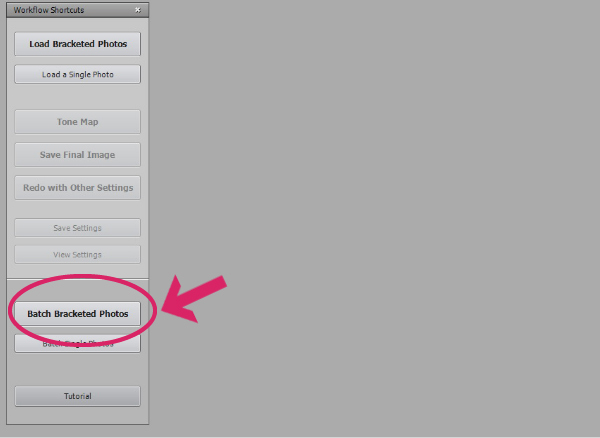
Step 1 – Launch Photomatix: The first thing we need to do is batch process our GoPro time-lapse sequence. At this point, you can launch your Photomatix software. We will be using existing presets that come pre-installed in Photomatix. You can create your own but that will be another tutorial. On the left-hand side of Photomatix select the option that says “Batch Single Photos”.
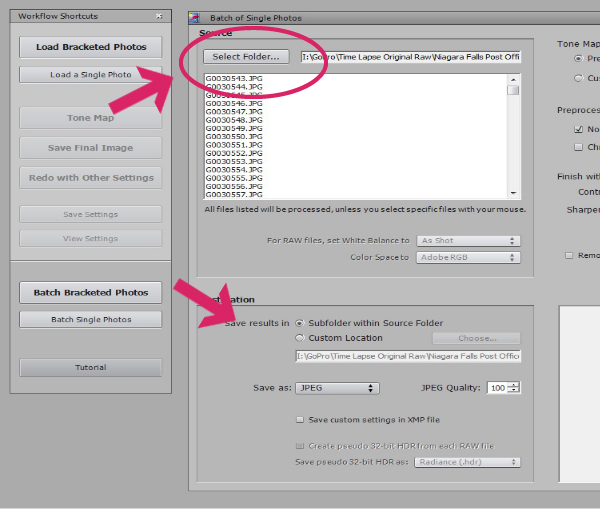
Step 2 – Set Image Location: In the next step we must tell Photomatix was the location of our GoPro time-lapse sequence is located. Use the “Select Folder” button to set the location of your files. Additionally, if you wish at this point you can set the location were Photomatix will save your new HDR photos. By default, It will just create a new subdirectory within the folder of the original images.
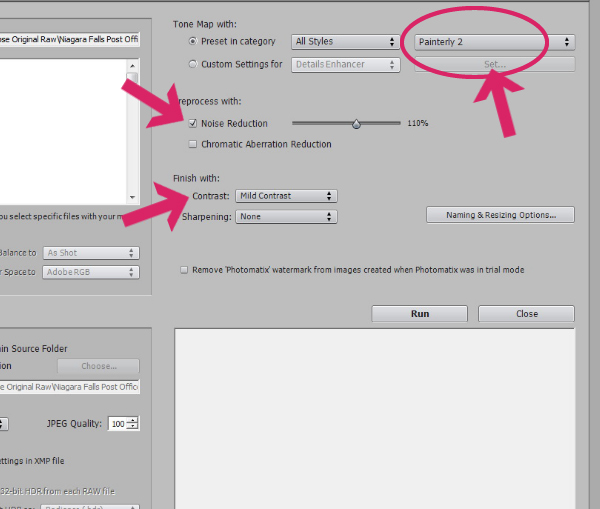
Step 3 – Set HDR Style Parameters: Now have to set our HDR parameters by selecting one of the available presets. For this tutorial, I have opted to go with painterly 2. You may want to play around with the different styles, some look better than others in different environments. I like to process with noise reduction as there can be a lot of noise associated with HDR. I usually set mine to 105% to 110%. Then next thing I like to add is a little contrast. For the most part, I usually set it to “Mild Contrast” this will differ from scene to scene. You can add some sharpening if you wish. for this tutorial, I am leaving it blank as I like to do my sharpening in GoPro Studio while we are creating the video later in this tutorial. Once you have all your parameters set click on the “Run” button to let Photomatix batch process all your images in your time-lapse sequence. This will take some time to complete, depending on your computer and how many images it could take upwards of an hour or longer. When completed move to the next step.
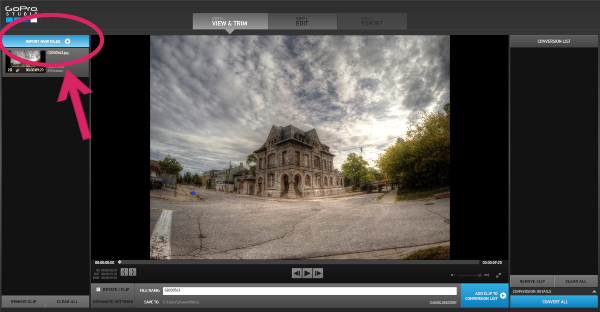
Step 4 – Load HDR Photos Into GoPro Studio: Now that all your images have been batch edited into HDR it now time to load them into GoPro Studio so we can assemble and then export the finished time-lapse into a video file. Load GoPro Studio and select “Import New Files”. Browse to where your new HDR image sequence is located, select all the images and open them.
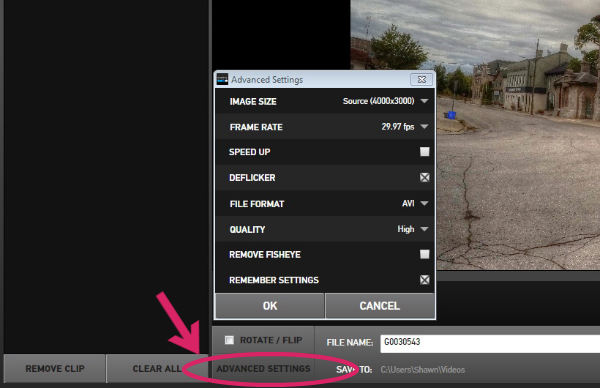
Step 5 – Convert Time-Lapse Files: You will notice that the files you just imported have been assembled into one viewable file. We now need to convert this file to a time-lapse video. Before we do it’s a good idea to check and make sure we have our conversion settings set properly. Click on advanced settings and make sure that image size is set to source and that quality is set to high. This allows for best quality export and more editing options later on. It’s also a good idea to enable “Deflicker”. Once done click on the “Add To Conversion List” button and then select “Convert All”. This will now convert our time-lapse sequence into a video file.
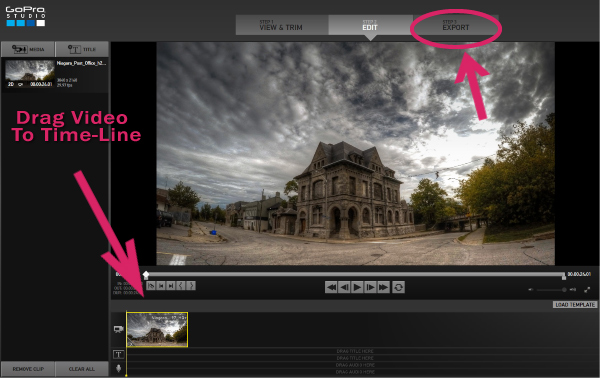
Step 6: Editing HDR Time-Lapse: Now we want to click on the label at the top of GoPro Studio called “Proceed To Step 2” When prompted create a new blank template. You will notice your new video file will be located on the left-hand side. Drag the time-lapse video file to the timeline. Once you have placed your time-lapse video file on the timeline it will automatically be cropped to a standard 16:9 aspect which is what we want for YouTube or Social Media. At this point, you can edit your time-lapse further with the controls on the right-hand side. These tools allow you to do more color correction, sharpen the video, add movement and speed up or slow down your time-lapse. For this tutorial, we are just going to leave things as is.
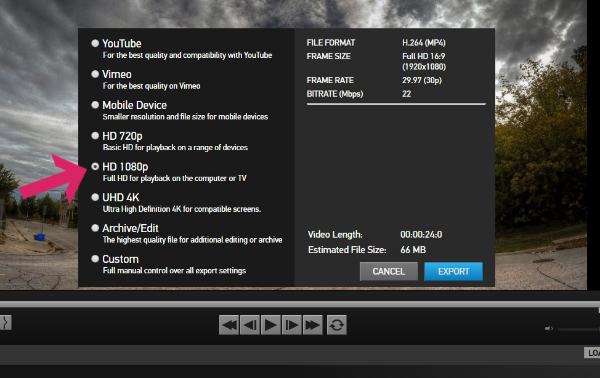
Step 7: Exporting HDR GoPro Timelapse: So now when your happy with your time-lapse it time to export your final video. Click on the “Export” button at the top of the page. Now you can choose your export preferences. You can export at 1080 HD or in 4K quality. Both work great for sharing on YouTube. Click on the export button and your new HDR GoPro time-lapse will be saved to your computer.