Have you ever seen those photos on Instagram that look so vibrant and surreal and wonder how they are created? Usually, they are photographed with expensive DSLR cameras but today I am going to show you have to achieve similar results with your iPhone. The old saying is true, the best camera is the one you have with you. In today’s world we always have a phone on us and most phones today have amazing cameras built-in. I decided to make this tutorial to show you how to take stunning HDR photos on your iPhone, these techniques will work on most other smartphones as well.
What is HDR Photography?
HDR stands for high dynamic range and is simply a way of capturing all low lights and high lights of a scene in one single photograph. An example of this would be if you are taking a picture of a tree against a bright beautiful sky. If you just take a normal picture, one of two things usually happen. (a) You will get a good focus on the tree with nice detail but the sky will be blown out and too bright to pick up any color or cloud detail, or (b) the sky will be full of detail and color, but the tree will be dark will little detail.
This is where HDR photography comes in by taking a series of (usually 3) bracketed photos in various exposures, one normal, one overexposed, and one underexposed. The 3 photos are then merged together into one single photo. This technique will make the entire photo explode with color and detail in both the sky and the tree. Here is an example of a series of 3 bracket photos taken on an iPhone.

Now here is the problem. This is simple to do on expensive DSLR cameras, but smartphones for the most part are not set up for this. There are many apps you can download that will run filters over your existing photo’s to try and emulate an HDR photo, but for the most part, the results are not desirable. There is a simple way to take bracketed photos right on your iPhone or smartphone with the help of an app called ProHDR or ProHDR X if you’re using an iPhone 6/7 series. ProHDR is an all in one app that does it all, takes bracketed photos in different exposures and then merges them for you all with one click of a button. We are going to take it one step further and not use the final image it creates. Instead, we will only be using the 3 bracketed photos it produces and creating our own merged HDR photo on our PC.
Tools you will need to take HDR and bracketed photos on an iPhone.
- ProHDR App for iPhone or similar bracketing photo app.
- Photomatix software for PC (there is a free demo version)
- iPhone or Android Smart Phone.
- Tripod (recommended)
Before we begin I recommend using a tripod as the camera will be taking 3 images and they need to line up, any slight camera movement will cause ghosting and blurry images. You don’t need a fancy tripod, there are inexpensive ones available at Walmart for less than $40 and you pick up a smartphone adaptor mount to attach your iPhone to the tripod at most dollar stores.
Step 1: Mount your iPhone on the tripod and line up your shot.
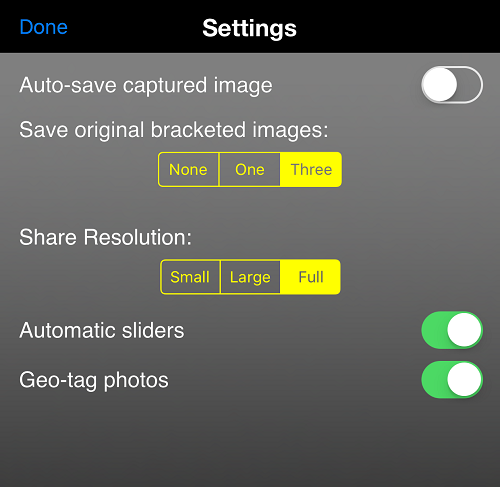
Step 2: Launch the Pro HDR app and go to the settings. There are a few changes we need to make from the default settings. The main changes to the settings are (a) turn off “Auto Save Captured Image” and (b) set the save original bracketed photos to three. See the attached image for settings.
Step 3: Now press the shutter button on the phone and it will capture 3 bracketed images and automatically save them to your phone’s camera roll. When you close the app it will prompt you that you haven’t saved the merged photo. Just ignore it, we are going to create our own merged photo in the next step.
Step 4: At this point, you need to transfer the 3 bracketed iPhone photos you just shot to your PC. This can be done many ways. Just make sure you transfer them in original full resolution.
Step 5: Now the fun begins. We will take our 3 bracketed photos and merge them into one photo using Photomatix by HDRsoft. If you haven’t done so, download Photomatix from the HDRsoft Website. This will be a free trial version and will have limitations. Once downloaded launch the application. At the top left-hand corner select the option to “Load Bracketed Photos”. Browse to the location of your 3 bracketed iPhone photos you saved to your PC and load them. A dialogue box will appear, make sure the settings are matched to the diagram below. There are many options but for now, we will stick to some basic settings.
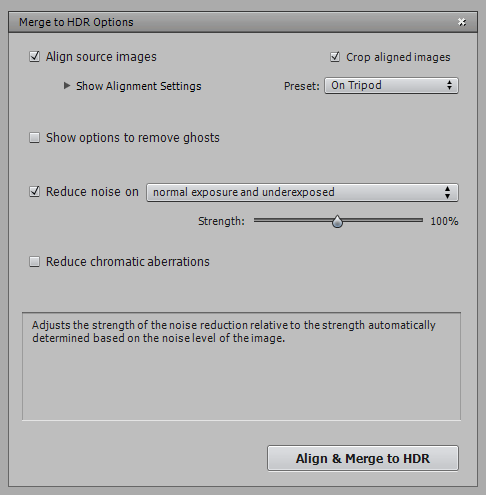
Once ready, click on the “align and merge to HDR” button this can take several minutes while it works its magic.
Step 6: Once the image is ready it will appear in the workspace. You can take time at this point to play with sliders and settings, however, there are many ready to go pre-sets on the right-hand side. Find a look that you like, then click the apply button. This will render your final image. Once complete, save the new HDR Photo that you created.
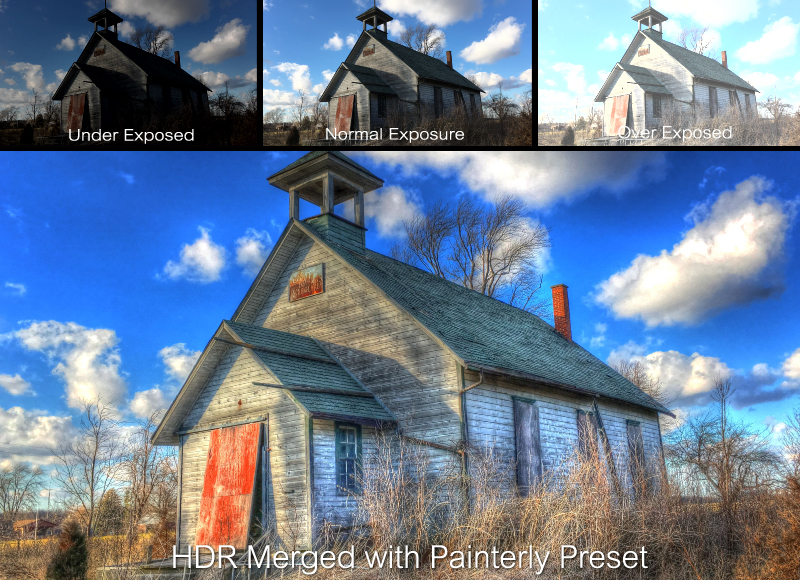
At this point, your photo will look great and you can print or share them as is, or you may want to take them a step further with some Photoshop tweaking. Here is an example of an HDR photo taken on an iPhone 6s. You can see the original iPhone bracketed photos and the final merged HDR Photo. Take notice of how detailed the sky is and all the wonderful detail in the old schoolhouse.
Things to consider when creating HDR Photos
When it comes to HDR Photography some people love it and some people very much dislike it. Sometimes the effects and color saturation are way overdone to the point the photo looks cartoonish. By my philosophy is that there is no right or wrong, after all it’s your photo and you are expressing yourself. If you like the end result, then the photo is perfect. Practice makes perfect! Continue trying different things, play with different angles and settings and you will find your own style.
I hope this article helped those looking to take bracketed HDR photos on your iPhone or smartphone.