How to capture beautiful HDR Photos with your GoPro
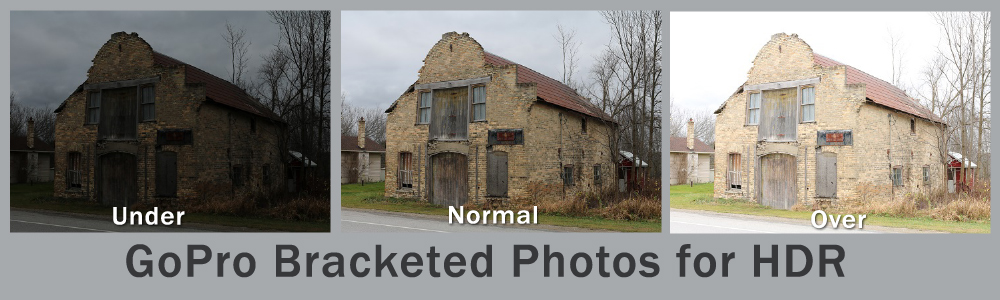
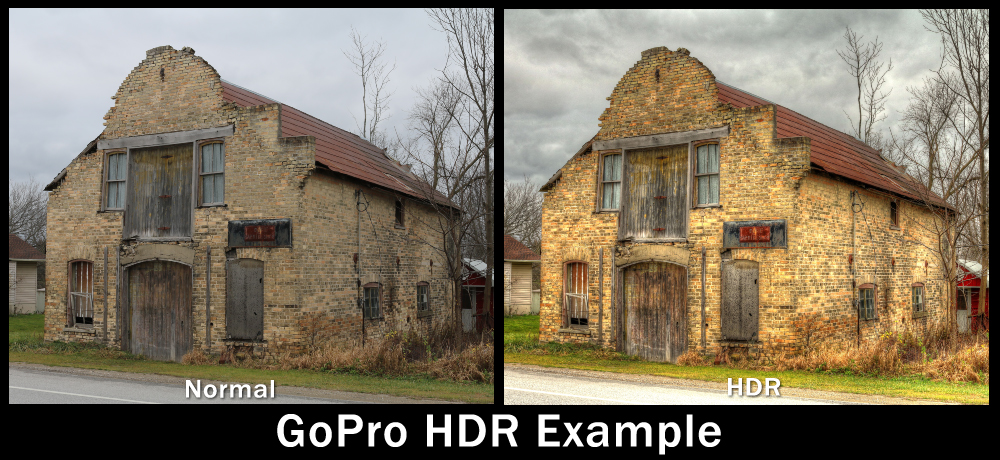
HDR stands for high dynamic range and traditionally HDR images are created with DSLR cameras by capturing a series of usually 3 images at different exposures also referred to as bracketing. There is one image of each capture (overexposed, normal and underexposed) usually by 2 stops per image. The photos are then merged in software to create one single image that has great exposure in all the bright and dark areas. The photos also tend to be very colorful and have a very surreal feel to them.
How To Take Bracketed Photos With A GoPro for HDR
GoPro’s out of the box are not really capable of this as you need a reliable way of taking 3 bracketed photos in different exposures. However, this problem is solved with a Smartphone app called GoPro HDR. With a click of a button, it will capture 3 or more bracketed photos remotely to your GoPro that can then be merged together. Follow the steps below to create stunning HDR Photos on your GoPro. The App is compatible with the GoPro Hero 4 series and GoPro Hero 5 Black. The App is available for download on Android phones and the iPhone.
HDR GoPro Photos Tutorial
Step One: Make sure you have the App installed on your phone. Connect your GoPro to your Smartphone via Wi-Fi and launch the GoPro capture app first. Set the GoPro to photo mode and make sure protune is on. Now Mount Your GoPro and line up your Shot.
Tip: It is very important to use a tripod. The GoPro must stay absolutely still while capturing the bracketed images. Any movement will cause ghosting or blurry images when they are merged later on.
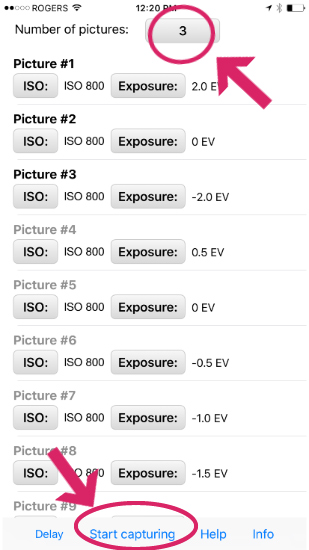
Step 2: Now its time to launch the GoPro HDR App. Select how many shots you would like it to capture. 3 to 5 shots is usually sufficient for the most part I only ever do 3. When you are ready to press the “Start Capturing” button and wait for the GoPro to take the bracketed photos.
Step 3: Now its time to transfer the bracketed photos to your computer or laptop. At this point in my tutorial, we will be using software from HDRSoft called Photomatix Pro to merge the bracketed images that we just shot. There are other applications that will perform the same functions including plug-ins for Photoshop.
Step 4: Launch the Photomatix Pro software. At the top right side of the screen click the button that reads ‘Load Bracketed Photos”. Browse to the location on your computer were you saved the GoPro bracketed images you just transferred. Select all 3 or 5 depending on how many you shot and open them.
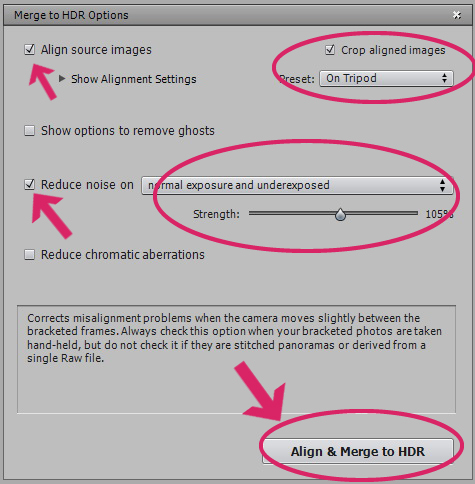
Step 5: A dialog will appear prompting you to input some settings. For this tutorial, we will use some basic settings. Use the diagram below to set your options. For the most part, we are going to tell the software that the images were created on a tripod so it knows how to align the images and that we want to reduce noise. There can be a lot of noise associated with HDR Photos. When ready press the “Align & Merge to HDR” Button. This can take several minutes to perform.
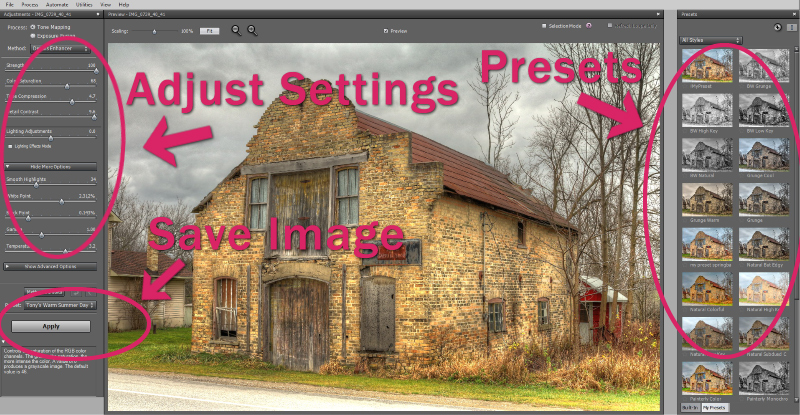
Step 6: The software will now align all images and merge them into one photo. Once ready you will be presented with your newly merged photo that already has some HDR effects applied to it. Now, this is not a tutorial on how to use Photomatix, but you can play around with the sliders on the left to achieve a look that you like or you can use the built-in presets on the right. Keep in mind this is just a preview, some things may look a little funny. We now need to render our image with the settings we selected. We do so by clicking on the ‘Apply” button on the right-hand side of the page. Your image will be rendered and presented to you.
Step 7: You will now see a copy of your final image. At this point, we could save our photo or we can make some fine tuning adjustments. A box called finishing touches will pop up with some tools. Under the “Sharpening” tab I like to set it to “Mild Sharpening”. Under the contrast tab, I like to bump up the shadows just a bit. You can also use the color tab to pull out some colors or tone them down. Just play with these until you like what you see. When done click on the “Save Final Image” button on the right-hand side of the page. The new beautiful HDR photo that you shot on your GoPro is now done.


Comments are closed.